3D Printing Trouble-Shooting

Trouble-shooting Guide

This guide is a great place to start if you are trying to improve the quality of your 3D printed parts. We have compiled an extensive list of the most common 3D printing issues along with the software settings that you can use to solve them. Best of all, the guide uses a large collection of real-world images to make each issue easy to identify when examining your own 3D printed parts. So let’s get started!

Not Extruding at Start of Print

This issue is a very common one for new 3D printer owners, but thankfully, it is also very easy to resolve! If your extruder is not extruding plastic at the beginning of your print, there are four possible causes. We will walk through each one below and explain what settings can be used to solve the problem.

Common Solutions

Extruder was not primed before beginning the print

Most extruders have a bad habit of leaking plastic when they are sitting idle at a high temperature. The hot plastic inside the nozzle tends to ooze out of the tip, which creates a void inside the nozzle where the plastic has drained out. This idle oozing can occur at the beginning of a print when you are first preheating your extruder, and also at the end of the print while the extruder is slowly cooling. If your extruder has lost some plastic due to oozing, the next time you try to extrude, it is likely that it will take a few seconds before plastic starts to come out of the nozzle again. If you are trying to start a print after you nozzle has been oozing, you may notice the same delayed extrusion. To solve this issue, make sure that you prime your extruder right before beginning a print so that the nozzle is full of plastic and ready to extrude. A common way to do this in Simplify3D is by including something called a skirt. The skirt will draw a circle around your part, and in the process, it will prime the extruder with plastic. If you need extra priming, you can increase the number of skirt outlines on the Additions tab in Simplify3D. Some users may also prefer to manually extrude filament from their printer using the Jog Controls in Simplify3D’s Machine Control Panel prior to beginning the print.


Nozzle starts too close to the bed

If the nozzle is too close to the build table surface, there will not be enough room for plastic to come out of the extruder. The hole in the top of the nozzle is essentially blocked so that no plastic can escape. An easy way to recognize this issue is if the print does not extrude plastic for the first layer or two, but begins to extrude normally around the 3rd or 4th layers as the bed continues to lower along the Z-axis. To solve this problem, you can use the very handy G-Code offsets which can be found on the G-Code tab of Simplify3D’s process settings. This allows you to make very fine adjustments to the Z-axis position without needing to change the hardware. For example, if you enter a value of 0.05mm for the Z-axis G-Code offset, this will move the nozzle 0.05mm further away from the print bed. Keep increasing this value by small increments until there is enough room between the nozzle and the build platform for the plastic to escape.


The filament has stripped against the drive gear

Most 3D printers use a small gear to push the filament back and forth. The teeth on this gear bite into the filament and allow it to accurately control the position of the filament. However, if you notice lots of plastic shavings or it looks like there is a section missing from your filament, then it’s possible that the drive gear has removed too much plastic. Once this happens, the drive gear won’t have anything left to grab onto when it tries to move the filament back and forth. Please see the Grinding Filament section for instructions on how to fix this issue.


The extruder is clogged

If none of the above suggestions are able to resolve the issue, then it is likely that your extruder is clogged. This can happen if foreign debris is trapped inside the nozzle, when hot plastic sits inside the extruder too long, or if the thermal cooling for the extruder is not sufficient and the filament begins to soften outside of the desired melt zone. Fixing a clogged extruder may require disassembling the extruder, so please contact your printer manufacturer before you proceed. We have had great success using the “E” string on a guitar to unclog extruders by feeding it into the nozzle tip, however, your manufacturer should also be able to provide recommendations.

Under-Extrusion

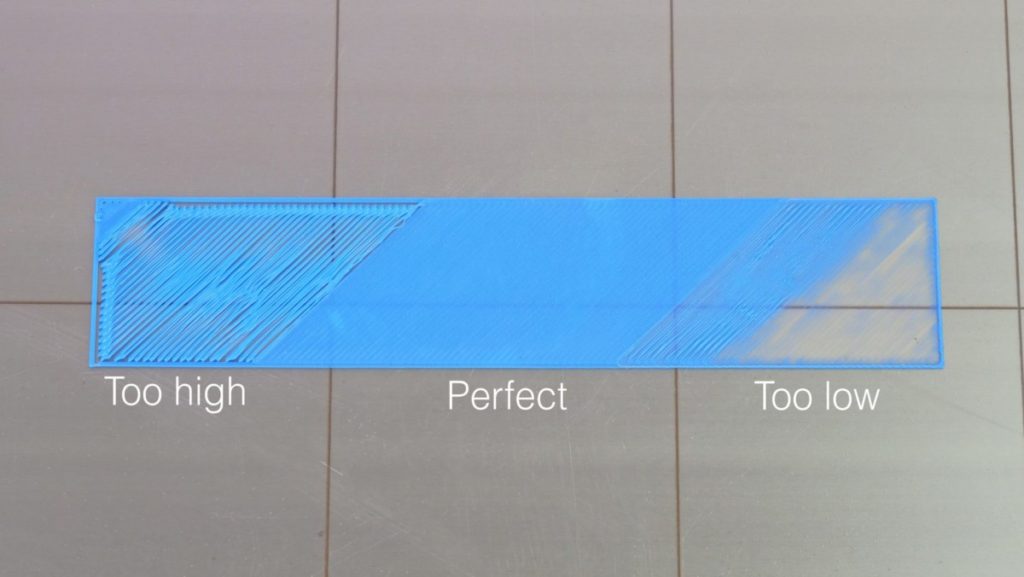
Each profile in Simplify3D includes settings that are used to determine how much plastic the 3D printer should extrude. However, because the 3D printer does not provide any feedback about how much plastic actually leaves the nozzle, it’s possible that there may be less plastic exiting the nozzle than what the software expects (otherwise known as under-extrusion). If this happens, you may start to notice gaps between adjacent extrusions of each layer. The most reliable way to test whether or not your printer is extruding enough plastic is to print a simple 20mm tall cube with at least 3 perimeter outlines. At the top of the cube, check to see if the 3 perimeters are strongly bonded together or not. If there are gaps between the 3 perimeters, then you are under-extruding. If the 3 perimeters are touching and do not have any gaps, then you are likely encountering a different issue. If you determine that you are under-extruding, there are several possible causes for this, which we have summarized below.


Common Solutions

Incorrect filament diameter

The first thing you want to verify is that the software knows the filament diameter that you are using. You can find this setting by clicking “Edit Process Settings” and going to the Other tab. Check to make sure that this value matches the filament that you purchased. You may even want to measure your filament yourself using a pair of calipers to make sure that you truly have the correct diameter specified in the software. The most common values for the filament diameter are 1.75mm and 2.85mm. Many spools of plastic also include the correct diameter on the packaging.


Increase the extrusion multiplier

If your filament diameter is correct, but you are still seeing under-extrusion issues, then you need to adjust your extrusion multiplier. This is a very useful setting in Simplify3D that allows you to easily modify the amount of plastic that is extruded (otherwise known as the flow rate). You can find this setting by clicking “Edit Process Settings” and going to the Extruder tab. Each extruder on your printer can have a unique extrusion multiplier, so if you are trying to modify the flow rate for a specific extruder, make sure to select it from the list on the left to load the settings for that extruder. As an example, if your extrusion multiplier was 1.0 previously and you change it to 1.05, it means you will be extruding 5% more plastic than you were previously. It is typical for PLA to print with an extrusion multiplier near 0.9, while ABS tends to have extrusion multipliers closer to 1.0. Try increasing your extrusion multiplier by 5%, and then reprint the test cube to see if you still have gaps between your perimeters.

Not sticking to the heat-bed

It is very important that the first layer of your print is strongly connected to the printer’s build platform so that the remainder of your part can be built on this foundation. If the first layer is not sticking to the build platform, it will create problems later on. There are many different ways to cope with these first layer adhesion problems, so we will examine several typical causes below and explain how to address each one.


Common Solutions

Build platform is not level

Many printers include an adjustable bed with several screws or knobs that control the position of the bed. If your printer has an adjustable bed and you’re having trouble getting your first layer to stick to the bed, the first thing you will want to verify is that your printer’s bed is flat and level. If the bed is not level, one side of your bed may be too close to the nozzle, while the other side is too far away. Achieving a perfect first layer requires a level print bed. Simplify3D already includes a useful bed leveling wizard that you guide you through the bed leveling process. You can find this wizard by going to Tools > Bed Leveling Wizard, and following the on-screen instructions.


Nozzle starts too far away from bed

Once your bed has been properly leveled, you still need to make sure that the nozzle is starting at the correct height relative to the build platform. Your goal is to locate your extruder the perfect distance away from the build plate — not too far and not too close. For good adhesion to the build plate, you want your filament to be slightly squished against the build plate. While you can adjust these settings by modifying the hardware, it is typically much easier (and much more precise!) to make these changes from Simplify3D. To do this, click “Edit Process Settings” to open your process settings and then go to the G-Code tab. You can use the Z-Axis global G-Code Offset to make very fine adjustments to your nozzle position. For example, if you enter -0.05mm for the Z-axis G-Code offset, the nozzle will begin printing 0.05mm closer to your build platform. Be careful to only make small adjustments to this setting. Each layer of your part is usually only around 0.2mm thick, so a small adjustment goes a long way!


First layer is printing too fast

As you extrude the first layer of plastic on top of the build platform, you want to make sure that plastic can properly bond to the surface before starting the next layer. If you print the first layer too fast, the plastic may not have time to bond to the build platform. For this reason, it is typically very useful to print the first layer at a slower speed so that the plastic has time to bond to the bed. Simplify3D provides a setting for this exact feature. If you click on “Edit Process Settings” and go to the Layer tab, you will see a setting labeled “First Layer Speed”. For example, if you set a first layer speed of 50%, it means that your first layer will print 50% slower than the rest of your part. If you feel that your printer is moving too fast on the first layer, try reducing this setting.


Temperature or cooling settings

Plastic tends to shrink as it cools from a warm temperature to a cool temperature. To provide a useful example, imagine a 100mm wide part that is being printed with ABS plastic. If the extruder was printing this plastic at 230 degrees Celsius, but it was being deposited onto a cold build platform, it is likely that the plastic would quickly cool down after leaving the hot nozzle. Some printers also include cooling fans that speed up this cooling process when they are being used. If this ABS part cooled down to a room temperature of 30C, the 100mm wide part would shrink by almost 1.5mm! Unfortunately, the build platform on your printer is not going to shrink this much, since it is typically kept at a fairly constant temperature. Because of this fact, the plastic will tend to separate from the build platform as it cools. This is an important fact to keep in mind as you print your first layer. If you notice that the layer seems to stick initially, but later separates from the print bed as it cools, it is possible that your temperature and cooling settings are to blame.

Many printers that are intended to print high-temperature materials like ABS include a heated bed to help combat these problems. If the bed is heated to maintain a temperature of 110C for the entire print, it will keep the first layer warm so that it does not shrink. So if your printer has a heated bed, you may want to try heating the bed to prevent the first layer from cooling. As a general starting point, PLA tends to adhere well to a bed that is heated to 60-70C, while ABS generally works better if the bed is heated to 100-120C. You can adjust these settings in Simplify3D by clicking on “Edit Process Settings” and then selecting the Temperature tab. Choose your heated build platform from the list on the left-hand side and then edit the temperature setpoint for the first layer. You can just double-click on the value to change it.

If your printer has a cooling fan, you may also want to try disabling that cooling fan for the first few layers of your printer so that the initial layers do not cool down too quickly. You can do this by clicking “Edit Process Settings” and going to the Cooling tab. You can adjust the fan speed setpoints on the left-hand side. For example, you may want the first layer to start with the fan disabled and then turn on the fan to full power once you reach the 5th layer. In that case, you will need to add two setpoints into that list: Layer 1 at 0% fan speed, and Layer 5 at 100% fan speed. If you are using ABS plastic, it is common to disable the cooling fan for the entire print, so entering a single setpoint would suffice (Layer 1 at 0% fan speed). If you are working in a breezy environment, you may also want to try to insulate your printer to keep the wind away from your part.


The build platform surface (tape, glues, and materials)

Different plastics tend to adhere better to different materials. For this reason, many printers include a special build platform material that is optimized for their materials. For example, several printers use a BuildTak sheet on the top of their bed that tends to stick very well to PLA. Other manufacturers opt for a heat treated glass bed such as Borosilicate glass, which tends to work very well for ABS when heated. If you are going to print directly onto these surfaces, it is always a good idea to make sure that your build platform is free of dust, grease, or oils before starting the print. Cleaning your print bed with some water or isopropyl rubbing alcohol can make a big difference.

If your printer does not include a special build platform material to help with adhesion, you still have options! Thankfully, there are several types of tape that stick well to common 3D printing materials. Strips of tape can be applied to the build platform surface and easily removed or replaced if you want to print with a different material. For example, PLA tends to stick well to blue painter’s tape while ABS tends to stick better to Kapton tape (otherwise known as Polyimide film). Many users have also had great success using a temporary glue or spray on the top of their build platforms. Hair spray, glue sticks, and other sticky substances tend to work very well if everything else has failed. Feel free to experiment to see what works best for you!


When all else fails: Brims and Rafts

Sometimes you are printing a very small part that simply does not have enough surface area to stick to the build platform surface. Simplify3D includes several options that can help increase this surface area to provide a larger surface to stick to the print bed. One of these options is called a “brim.” The brim adds extra rings around the exterior of your part, similar to how a brim of a hat increases the circumference of the hat. This option can be enabled by going to the “Additions” tab end enabling the “Use Skirt/Brim” option. Simplify3D also allows users to add a raft under their part, which can also be used to provide a larger surface for bed adhesion. If you are interested in these options, please take a look at our Rafts, Skirts, and Brims tutorial which explains things in greater detail.

Stringing or Oozing

Stringing (otherwise known as oozing, whiskers, or “hairy” prints) occurs when small strings of plastic are left behind on a 3D printed model. This is typically due to plastic oozing out of the nozzle while the extruder is moving to a new location. Thankfully, there are several settings within Simplify3D that can help with this issue. The most common setting that is used to combat excessive stringing is something that is known as retraction. If retraction is enabled, when the extruder is done printing one section of your model, the filament will be pulled backwards into the nozzle to act as a countermeasure against oozing. When it is time to begin printing again, the filament will be pushed back into the nozzle so that plastic once again begins extruding from the tip. To ensure retraction is enabled, click “Edit Process Settings” and click on the Extruder tab. Ensure that the retraction option is enabled for each of your extruders. In the sections below, we will discuss the important retraction settings as well as several other settings that can be used to combat stringing, such as the extruder temperature settings.


Common Solutions

Retraction distance

The most important retraction setting is the retraction distance. This determines how much plastic is pulled out of the nozzle. In general, the more plastic that is retracted from the nozzle, the less likely the nozzle is to ooze while moving. Most direct-drive extruders only require a retraction distance of 0.5-2.0mm, while some Bowden extruders may require a retraction distance as high as 15mm due to the longer distance between the extruder drive gear and the heated nozzle. If you encounter stringing with your prints, try increasing the retraction distance by 1mm and test again to see if the performance improves.


Retraction speed

The next retraction setting that you should check is the retraction speed. This determines how fast the filament is retracted from the nozzle. If you retract too slowly, the plastic will slowly ooze down through the nozzle and may start leaking before the extruder is done moving to its new destination. If you retract too quickly, the filament may separate from the hot plastic inside the nozzle, or the quick movement of the drive gear may even grind away pieces of your filament. There is usually a sweet spot somewhere between 1200-6000 mm/min (20-100 mm/s) where retraction performs best. Thankfully, Simplify3D has already provided many pre-configured profiles that can give you a starting point for what retraction speed works best, but the ideal value can vary depending on the material that you are using, so you may want to experiment to see if different speeds decrease the amount of stringing that you see.


Temperature is too high

Once you have checked your retraction settings, the next most common cause for excessive stringing is the extruder temperature. If the temperature is too high, the plastic inside the nozzle will become less viscous and will leak out of the nozzle much more easily. However, if the temperature is too low, the plastic will still be somewhat solid and will have difficulty extruding from the nozzle. If you feel you have the correct retraction settings, but you are still encountering these issues, try decreasing your extruder temperature by 5-10 degrees. This can have a significant impact on the final print quality. You can adjust these settings by clicking “Edit Process Settings” and selecting the Temperature tab. Select your extruder from the list on the left, and then double-click on the temperature setpoint you wish to edit.


Long movements over open spaces

As we discussed above, stringing occurs when the extruder is moving between two different locations, and during that move, plastic starts to ooze out of the nozzle. The length of this movement can have a large impact on how much oozing takes place. Short moves may be quick enough that the plastic does not have time to ooze out of the nozzle. However, long movements are much more likely to create strings. Thankfully, Simplify3D includes an extremely useful feature that can help minimize the length of these movements. The software is smart enough that it can automatically adjust the travel path to make sure that nozzle has a very short distance to travel over an open space. In fact, in many cases, the software may be able to find a travel path that avoids crossing an open space all together! This means that there is no possibility to create a string, because the nozzle will always be on top of the solid plastic and will never travel outside the part. To use this feature, click on the Advanced tab and enable the “Avoid crossing outline for travel movement” option.


Movement Speed

Finally, you may also find that increasing the movement speed of your machine can also reduce the amount of time that the extruder can ooze when moving between parts. You can verify what movement speeds your machine is using by clicking on the Speeds tab of your process settings. The X/Y Axis Movement Speed represents the side-to-side travel speed, and is frequently directly related to the amount of time your extruder spends moving over open air. If your machine can handle moving at higher speeds, you may find that increasing this settings can also reduce stringing between parts.

Grinding Filament

Most 3D printers use a small drive gear that grabs the filament and sandwiches it against another bearing. The drive gear has sharp teeth that allow it to bite into the filament and push it forward or backward, depending on which direction the drive gear spins. If the filament is unable to move, yet the drive gear keeps spinning, it can grind away enough plastic from the filament so that there is nothing left for the gear teeth to grab on to. Many people refer to this situation as the filament being “stripped,” because too much plastic has been stripped away for the extruder to function correctly. If this is happening on your printer, you will typically see lots of small plastic shavings from the plastic that has been ground away. You may also notice that the extruder motor is spinning, but the filament is not being pulled into the extruder body. We will explain the easiest way to resolve this issue below.


Common Solutions

Aggressive Retraction Settings

One of the first things you will want to check are the retraction settings for your extruder. If the retraction speed is too fast, or you are trying to retract far too much filament, it may put excessive stress on your extruder and the filament will struggle to keep up. As an easy test, you can try reducing your retraction speed by 50% to see if the problem goes away. If so, you know that your retraction settings may be part of the problem.


Increase the extruder temperature

If you continue to encounter filament grinding, try to increase the extruder temperature by 5-10 degrees so that the plastic flows easier. You can do this by clicking “Edit Process Settings” and selecting the Temperature tab. Select your extruder from the list on the left and then double-click on the temperature setpoint you wish to change. Plastic will always flow easier at a higher temperature, so this can be a very helpful setting to adjust.


Printing too fast

If you continue to encounter filament grinding, even after increasing the temperature, then the next thing you should do is decrease the printing speed. By doing this, the extruder motor will not need to spin as fast, since the filament is extruded over a longer period of time. The slower rotation of the extruder motor can help avoid grinding issues. You can adjust this setting by clicking “Edit Process Settings” and selecting the Speeds tab. Adjust the “Default Printing Speed,” which controls the speed of any movements where the extruder is actively extruding plastic. For example, if you were previously printing at 3600 mm/min (60 mm/s), try decreasing that value by 50% to see if the filament grinding goes away.


Check for a nozzle clog

If you are still encountering filament grinding after increasing the temperature and slowing down the print speed, then it’s likely your nozzle is partially clogged. Please read the Clogged Extruder section for instructions on how to troubleshoot this issue.

Layer Shifting

Most 3D printers use an open-loop control system, which is a fancy way to say that they have no feedback about the actual location of the toolhead. The printer simply attempts to move the toolhead to a specific location, and hopes that it gets there. In most cases, this works fine because the stepper motors that drive the printer are quite powerful, and there are no significant loads to prevent the toolhead from moving. However, if something does go wrong, the printer would have no way to detect this. For example, if you happened to bump into your printer while it was printing, you might cause the toolhead to move to a new position. The machine has no feedback to detect this, so it would just keep printing as if nothing had happened. If you notice misaligned layers in your print, it is usually due to one of the causes below. Unfortunately, once these errors occur, the printer has no way to detect and fix the problem, so we will explain how to resolve these issues below.


Common Solutions

Toolhead is moving too fast

If you are printing at a very high speed, the motors for your 3D printer may struggle to keep up. If you attempt to move the printer faster than the motors can handle, you will typically hear a clicking sound as the motor fails to achieve the desired position. If this happens, the remainder of the print will be misaligned with everything that was printed before it. If you feel that your printer may be moving too fast, try to reduce the printing speed by 50% to see if it helps. To do this, click “Edit Process Settings” and select the Speeds tab. Adjust both the “Default Printing Speed” and the “X/Y Axis Movement Speed.” The default printing speed controls the speed of any movements where the extruder is actively extruding plastic. The X/Y axis movement speed controls the speed of rapid movements where no plastic is being extruded. If either of those speeds are too high, it can cause shifting to occur. If you are comfortable adjusting more advanced settings, you may also want to consider lowering the acceleration settings in your printer’s firmware to provide a more gradual speed up and slow down.


Mechanical or Electrical Issues

If the layer misalignment continues, even after reducing your print speed, then it is likely due to mechanical or electrical issues with the printer. For example, most 3D printers use belts that allow the motors to control the position of the toolhead. The belts are typically made of a rubber material and reinforced with some type of fiber to provide additional strength. Over time, these belts may stretch, which can impact the belt tension that is used to position the toolhead. If the tension becomes too loose, the belt may slip on top of the drive pulley, which means the pulley is rotating, but the belt is not moving. If the belt was originally installed too tight, this can also cause issues. An overtightened belt can create excess friction in the bearings that will prevent the motors from spinning. Ideal assembly requires a belt that is somewhat tight to prevent slipping, but not too tight to where the system is unable to rotate. If you start noticing issues with misaligned layers, you should verify that your belts all have the appropriate tension, and none appear to be too loose or too tight. If you think there may be a problem, please consult the printer manufacturer for instructions on how to adjust the belt tension.

Many 3D printers also include a series of belts that are driven by pulleys attached to a stepper motor shaft using a small set-screw (otherwise known as a grub screw). These set-screws anchor the pulley to the shaft of the motor so that the two items spin together. However, if the set-screw loosens, the pulley will no longer rotate together with the motor shaft. This means that the motor may be spinning, but the pulley and belts are not moving. When this happens, the toolhead does not get to the desired location, which can impact the alignment of all future layers of the print. So if layer misalignment is a reoccurring problem, you should verify that all of the motor fasteners are properly tightened.

There are also several other common electrical issues that can cause the motors to lose their position. For example, if there is not enough electrical current getting to the motors, they won’t have enough power to spin. It is also possible that the motor driver electronics could overheat, which causes the motors to stop spinning temporarily until the electronics cool down. While this is not an exhaustive list, it provides a few ideas for common electrical and mechanical causes that you may want to check if layer shifting is a persistent problem.

Clogged Extruder

Your 3D printer must melt and extrude many kilograms of plastic over its lifetime. To make things more complicated, all of this plastic must exit the extruder through a tiny hole that is only as big as a single grain of sand. Inevitably, there may come a time where something goes wrong with this process and the extruder is no longer able to push plastic through the nozzle. These jams or clogs are usually due to something inside the nozzle that is blocking the plastic from freely extruding. While this may be daunting the first time it happens, but we will walk through several easy troubleshooting steps that can be used to fix a jammed nozzle.


Common Solutions

Manually push the filament into the extruder

One of the first things you may want to try is manually pushing the filament into the extruder. Open Simplify3D’s Machine Control Panel and heat your extruder to the appropriate temperature for your plastic. Next, use the Jog Controls tab to extruder a small amount of plastic, for example, 10mm. As the extruder motor is spinning, lightly use your hands to help push the filament into the extruder. In many cases, this added force will be enough to advance the filament past the problem area.


Reload the filament

If the filament still isn’t moving, the next thing you should do is unload the filament. Verify that the extruder is heated to the appropriate temperature, and then use Simplify3D’s machine control panel to retract the filament out of the extruder. As before, you may need to apply some additional force if the filament isn’t moving. Once the filament is removed, use a pair of scissors to cut away the melted or damaged portion of the filament. Then reload the filament and see if you are able to extrude with the new, undamaged section of filament.


Clean out the nozzle

If you weren’t able to extrude the new section of plastic through the nozzle, then it’s likely you will need to clean out the nozzle before proceeding. Many users have had success heating their extruder to 100C and then manually pulling the filament out (hopefully along with any debris that was inside!). Others prefer to use the E string from a guitar to push the material backwards through the nozzle tip. There are plenty of other methods and each extruder is different, so please consult your printer manufacturer for precise instructions.